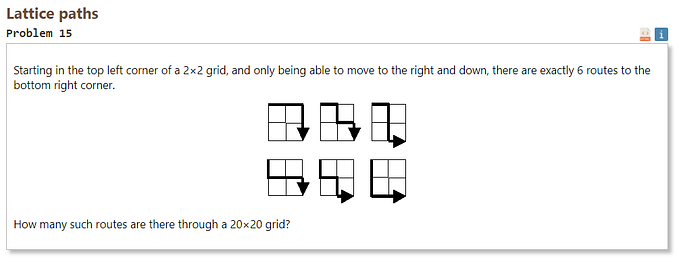
The Redux Flow
If you’re just dipping your toe into React + Redux, I wrote this for you. The code-flow gets tricky when you build an app using this framework, so I’m going to break down the construction of an app from inception to hosting locally using React and Redux. We’re going to build out; create, read, and delete functionality, and our app will be using a Rails back-end. So, let’s get started.
My application is a service reservation system, so I will be using that idea as an example to help give context to the ideas.
Phase I — Build an API
Set up the Rails app:

Replace ‘my_api’ with the name of your app and refer to the link above if you run into trouble. You should have something that looks like this:

Figure out what sort of objects / classes are going to be necessary for your application to function. In my example, I know that I will have hotel reservations, rooms, and customers. Each of these objects will need full CRUD functionality. I used a has-many through relationship, which is detailed below. Click the link at the bottom to explore more possibilities.


At this point, I have a few classes with corresponding relationships. Run ‘rails db:migrate’ and you will have a database ready to accept information. Next it’s a good idea to seed your application with some data, so you have something to work with. Rails makes this easy, so using the example, my seeds look like this:

Once written, add that data to your database using ‘rails db:seed’. Now your your database is fully operational, and you need to make that information available outside your application. Create your controllers, and be sure to render your data using ‘render:json’ as seen below:

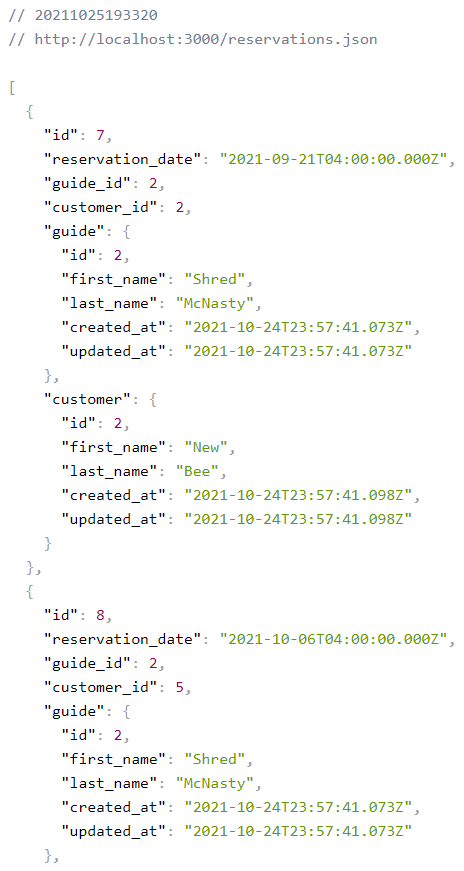
You’re ready to launch. Check your work by running ‘rails s’. In your browser open ‘http://localhost:3000/reservations.json’. This should render something like what you see below. Notice I am using a different API here, but the basics should be similar. You can also spend some time editing what information is available using strong-params and serializers. Strong params will add security to your back-end and serializers make things run a bit more quickly. Neither add on is required.
Phase II — Start building in React / Redux
Install React:

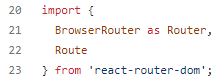
There are a few ways to frame your project, but I started with building routes and then filled in the blank canvas on each individual page. Building a route comes down to using a router package. I used BrowserRouter by adding these lines at the top of the App.js file:
Once this package is made available, routes can be constructed like this:
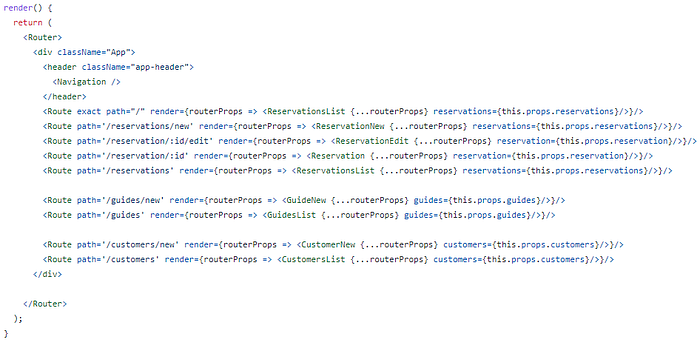
Notice that I am using restful routing patterns for each route that is added. Also notice that I am passing specific classes to each route. Looking at ‘/reservations’, you see that ReservationList.js is rendered on that route. Also note that the prop ‘reservations={this.props.reservations}’ is being passed into that class. We’ll get back to this in a moment.
Now we need to set up our index.js file. There are a bunch of important pieces, so lets break it down.
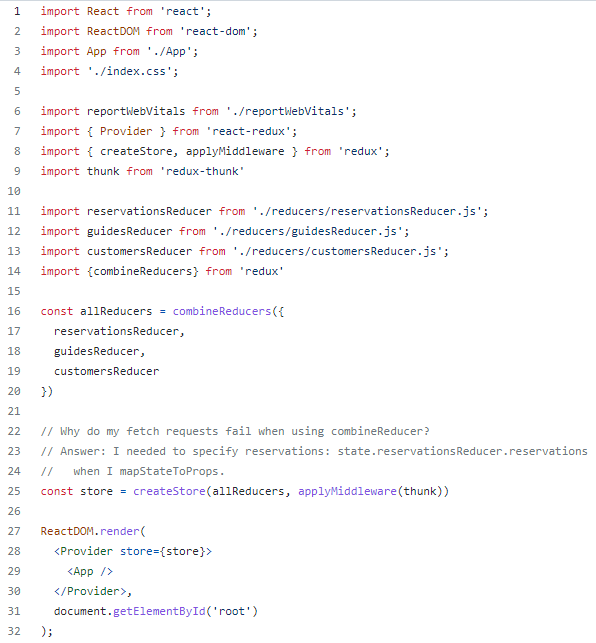
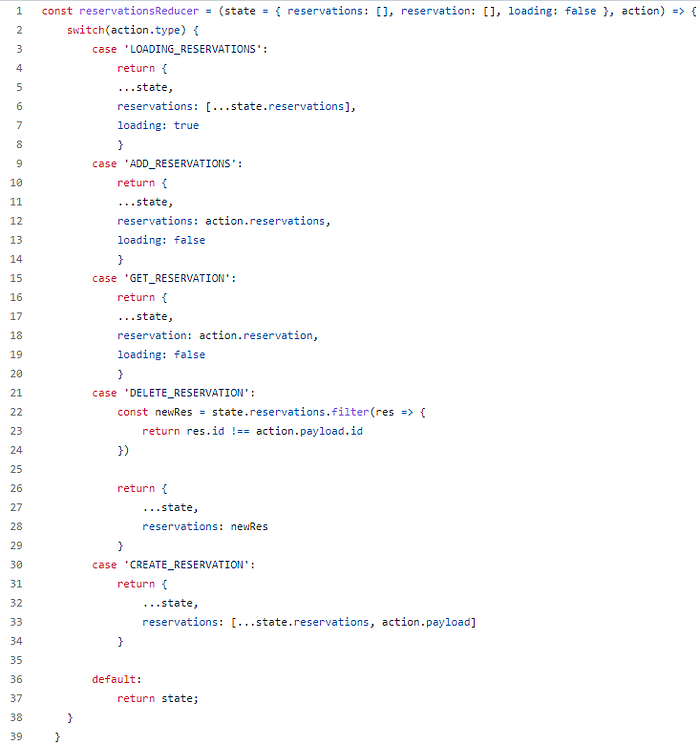
Lines 7–9 are creating a ‘store’ that will serve as a more global version of ‘state’ that I assume you understand already. If not, do some homework to get your head around the basics of React. Lines 11–14 are referring to our reducers which route various dispatch requests to our store, which is officially instantiated on line 25. So what is a dispatch and where are these reducers. The reducer has one job, and that is to update our store (again that’s our global state). This is one of my reducers below and it works like a big if-then statement. If the dispatch type is ‘ADD_RESERVATIONS’ then return lines 10–14. The bonus with a reducer is that you can pass actions along with those conditionals. So to continue on our ‘ADD_RESERVATIONS’ dispatch:
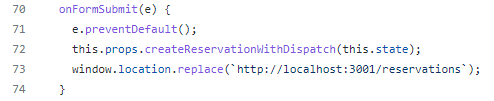
The reducer is triggered when, ‘this.props.createReservationsWithDispatch’ sends a dispatch from the ReservationNew.js file to the reducer (below #3) and the action is the argument. In this case a local state is dispatched to the reducer.
- The state here will return the previous state first using a spread operator. This is important because it persists the previous state.
- The reservations array (created on line 1) is updated using the action that is passed into this statement.
Now that our global state is updated, we can access this anywhere in our application by adding a few lines of code. First you need to connect a component to the global state using ‘connect’.

The store is connected, but not yet available in the app. Now we need to set up two major connectors.

- MapDispatchToProps — This is opening the connection point to be able to send a dispatch to the store. In this case I am using a separate actions file, but any function can be passed into this map function. Now if that function is called within this class, it will update store.
- MapStateToProps — This is grabbing the data from the store and making that available in ‘this.props’. Quite simply it takes data from the global store and makes it locally available.
If you only need one of these, then replace the function with ‘null’ on line 131. This brings me back to routes where we started. We cannot quite get ahold of our global store unless we are passing that as a prop using our router.

Data is moving around a lot, but it breaks down like this:
App.js — Establishes routes and defines which files render for each
Reducers— Direct various dispatches to appropriately update store
Components — Render content on the DOM and dispatch events to the reducers (ideally through actions)
Index — Ties it all together
With these basic components set up, you should be able to render some content. ‘npm start’ will boot up a front-end server. To get things going you will need to run both your rails server and your front-end server simultaneously. Boot your rails server first that’s ‘rails s’. Then when you run ‘npm start’ you will be prompted to start your front-end using localhost:3001. Type ‘y’ and your server will be up and running. I hope this makes redux a little more digestible, happy coding.